Rice Krispie Pumpkins Recipe
Introduction
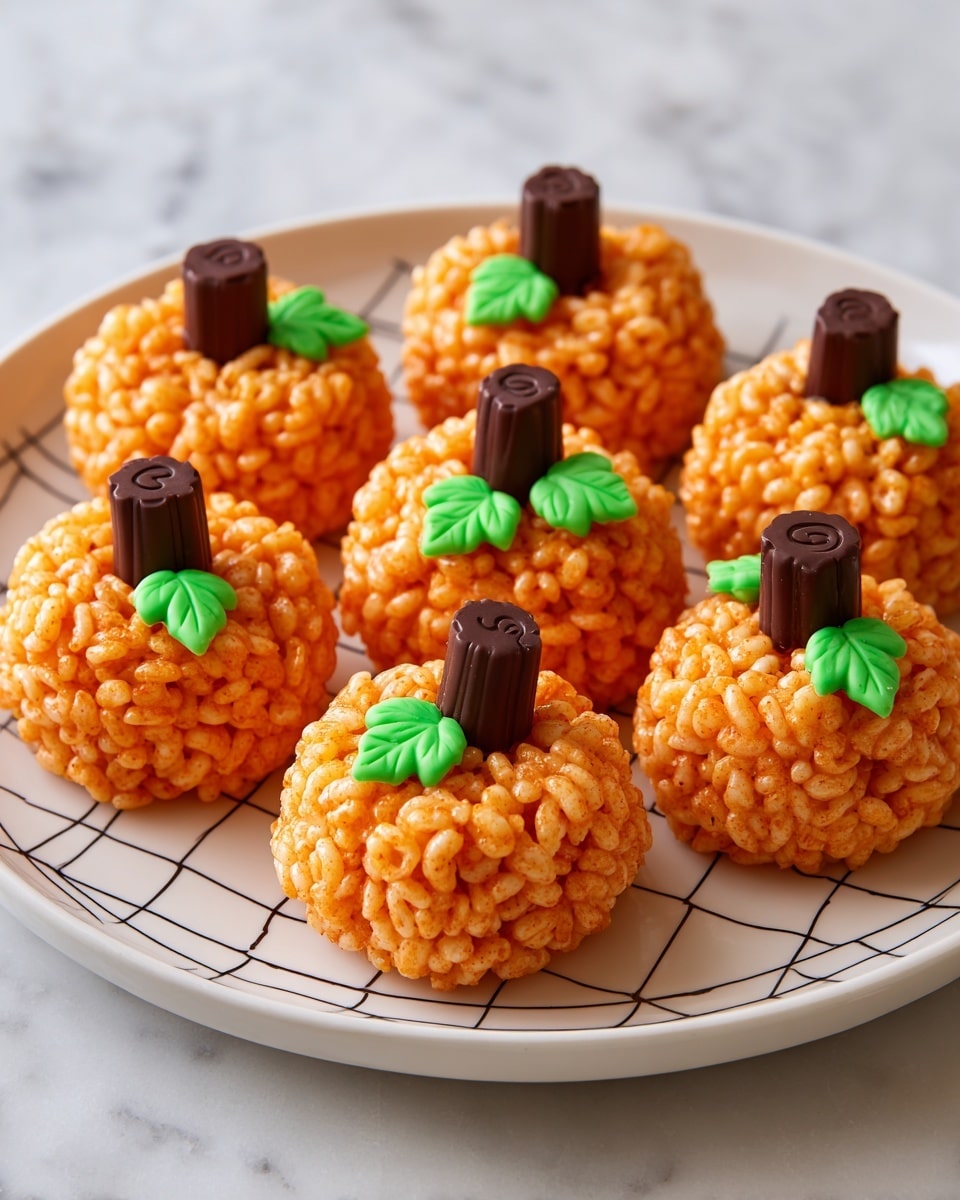
These Rice Krispie Pumpkins are a fun and festive treat perfect for fall celebrations. Made with classic marshmallow and cereal, they are easy to shape and decorate like little pumpkins, making them great for kids and adults alike.

Ingredients
- 6 cups Rice Krispies Cereal
- 6 cups Miniature Marshmallows
- 3 tablespoons Unsalted Butter
- Orange Gel Food Coloring
- 10 Tootsie Roll Candies
- 10 Green M&M Candies
Instructions
- Step 1: In a large pot, melt the unsalted butter over medium heat.
- Step 2: Once the butter is melted, add the miniature marshmallows and cook over medium heat, stirring frequently, until completely melted and smooth.
- Step 3: Remove the pot from heat and stir in ½ teaspoon of orange gel food coloring. Add more if needed to get your perfect pumpkin shade.
- Step 4: Add the Rice Krispies cereal to the melted marshmallow mixture and stir until the cereal is well coated and the color is evenly distributed.
- Step 5: Lightly spray your hands with non-stick spray to prevent sticking, then shape the mixture into 10 large balls.
- Step 6: Insert a Tootsie Roll candy in the center top of each ball to form the pumpkin “stump,” and place a green M&M next to it for the “leaf.”
- Step 7: Let the pumpkin treats set at room temperature for about an hour to firm up before serving.
Tips & Variations
- Use wax paper or a silicone mat to shape the balls if you prefer not to handle sticky mixture directly.
- For a fun twist, add a pinch of cinnamon or pumpkin pie spice to the melted marshmallow for extra fall flavor.
- Substitute green candy melts or icing for the leaf if you can’t find green M&Ms.
Storage
Store the Rice Krispie Pumpkins in an airtight container at room temperature for up to 3 days. Avoid refrigeration as it can make them hard. If they soften, let them sit at room temperature for a bit before serving.
How to Serve
Serve this delicious recipe with your favorite sides.
FAQs
Can I make these pumpkin treats gluten-free?
Yes, choose gluten-free crispy rice cereal and confirm your other ingredients like marshmallows are gluten-free to ensure the treats are safe for gluten sensitivities.
How do I keep the marshmallow mixture from sticking to my hands?
Spraying your hands lightly with non-stick cooking spray before shaping helps prevent sticking. You can also use wax paper or gloves if preferred.
PrintRice Krispie Pumpkins Recipe

Delightful Rice Krispie Pumpkins are a festive, no-bake treat perfect for fall celebrations. These pumpkin-shaped rice krispie treats are tinted with vibrant orange gel food coloring and detailed with Tootsie Roll ‘stumps’ and green M&M ‘leaves’ to create adorable edible pumpkins. Easy to make and fun to shape, they are a perfect seasonal snack for kids and adults alike.
- Prep Time: 10 minutes
- Cook Time: 10 minutes
- Total Time: 1 hour 20 minutes
- Yield: 10 pumpkin-shaped treats 1x
- Category: Dessert
- Method: Stovetop
- Cuisine: American
Ingredients
Main Ingredients
- 6 cups Rice Krispies Cereal
- 6 cups Miniature Marshmallows
- 3 tablespoons Unsalted Butter
- Orange Gel Food Coloring (about ½ teaspoon or to desired shade)
Decorations
- 10 Tootsie Roll Candies (for pumpkin stumps)
- 10 Green M&M Candies (for pumpkin leaves)
Instructions
- Melt Butter and Marshmallows: In a large pot over medium heat, melt the unsalted butter. Once melted, add the miniature marshmallows and stir frequently until completely melted and smooth.
- Add Orange Coloring: Remove the pot from heat and stir in ½ teaspoon of orange gel food coloring. Mix well to evenly distribute the color. Add more if a deeper pumpkin shade is desired.
- Mix in Cereal: Add the Rice Krispies cereal to the marshmallow mixture, folding and stirring gently until the cereal is fully coated with the orange marshmallow mixture.
- Shape into Pumpkins: Lightly spray your hands with non-stick cooking spray. Working quickly, form the mixture into 10 large balls resembling pumpkins.
- Add Detailing: Insert one Tootsie Roll candy into the center top of each ball to serve as the pumpkin stem. Place a green M&M candy adjacent to the stem to mimic a pumpkin leaf.
- Set and Serve: Allow the pumpkin-shaped treats to set uncovered at room temperature for about 1 hour to firm up before serving.
Notes
- Ensure hands are sprayed with cooking spray to prevent the sticky mixture from adhering to your skin.
- Work quickly as the marshmallow mixture hardens as it cools.
- You can substitute regular food coloring if gel is unavailable but gel provides a more vibrant color without adding extra liquid.
- Store in an airtight container to maintain freshness for up to 3 days.
- For extra festive look, dust with a little edible glitter or use colored sugar sprinkles.
Keywords: Rice Krispie Treats, Halloween Treats, Pumpkin Snacks, No-Bake Dessert, Fall Recipes, Kid-Friendly Dessert