Chocolate Lava Cakes Recipe
“`html
If you’re craving a dessert that feels like a warm hug in every bite, this Chocolate Lava Cakes Recipe is your new best friend in the kitchen. Imagine a perfectly baked cake with a delicate crust on the outside and an irresistible molten chocolate center that oozes out the moment you cut in. It’s rich, decadent, and surprisingly simple to make at home — an absolute showstopper for any occasion or just because you deserve a little chocolate indulgence.
Ingredients You’ll Need
This recipe calls for straightforward, pantry-friendly ingredients that come together to create pure chocolate magic. Each one plays a vital role in balancing flavor and texture — from the creamy butter to the silky melted chocolate and the eggs that give the cakes their airy lift.
- Butter: Both for greasing the ramekins and enriching the batter, it adds that luscious mouthfeel we all adore.
- Unsweetened cocoa powder: Dusting the ramekins in cocoa perfectly complements the chocolate exterior with a subtle bittersweet note.
- Chopped semisweet or bittersweet chocolate: This is the soul of the recipe, providing deep chocolate flavor and that luxurious molten center.
- Salted butter: Adds richness and a hint of saltiness that perfectly balances the sweetness of the cake.
- Pinch of salt: Enhances the chocolate flavor and balances the sweetness beautifully.
- Vanilla extract: Brings a warm, aromatic layer of flavor that you’ll notice with every bite.
- Large eggs and egg yolks: Key to creating that smooth, airy cake texture and binding all ingredients harmoniously.
- Powdered sugar: Sweetens the batter evenly and contributes to the soft texture of the cakes.
- All-purpose flour: Just enough to give the cakes structure while keeping them tender.
How to Make Chocolate Lava Cakes Recipe
Step 1: Preheat and Prepare Your Ramekins
Start by heating your oven to 375-400 degrees Fahrenheit — the sweet spot for baking these perfect little cakes. Next, thoroughly grease six 6- or 8-ounce ramekins with softened butter, paying close attention to every curve, especially where the sides meet the bottom. Then, sprinkle cocoa powder inside each ramekin, coating evenly and tapping out any excess. This ensures the cakes will slip out smoothly after baking and adds a subtle chocolate edge.
Step 2: Melt Chocolate and Butter
In a microwave-safe bowl, combine the chopped chocolate with butter, melting in short 1-minute bursts and stirring after each until you have a smooth, glossy mix. You can also melt them gently on the stove if you prefer. Take care not to overheat this mixture to keep it silky and luscious. Once melted, stir in a pinch of salt and the vanilla extract, then set aside to cool just until warm or room temperature.
Step 3: Whip Eggs and Yolks
Using a hand mixer or stand mixer, beat the whole eggs along with the three egg yolks until they become thick, foamy, and pale in color — about 2 to 3 minutes. This step is crucial as it aerates the batter, giving the cakes a light yet tender crumb. Don’t rush it; this is the secret to a perfectly soft exterior.
Step 4: Combine Sugar, Chocolate, and Flour
Add the powdered sugar to your whipped eggs and mix gently until just combined. Then fold in the cooled melted chocolate mixture along with the flour. Use a spatula to gently mix everything until just blended — overmixing can make the cakes dense, so stop when you no longer see streaks of flour.
Step 5: Fill Ramekins and Bake
Divide the batter equally among the prepared ramekins, filling each about two-thirds full. Place the ramekins on a large baking sheet spaced apart, and slide them into your preheated oven. Bake for 12 to 13 minutes until the edges are set but the centers still jiggle slightly — that’s the sign your molten lava is just waiting to burst forth.
Step 6: Rest and Unmold
After baking, let the cakes sit for 2 to 3 minutes so they can settle without losing their gooey centers. Then carefully run a knife around the edges to loosen them. Invert each ramekin onto a plate, gently tapping if necessary, and watch the warm cake slip out with its molten heart inviting you in for the first bite.
How to Serve Chocolate Lava Cakes Recipe

Garnishes
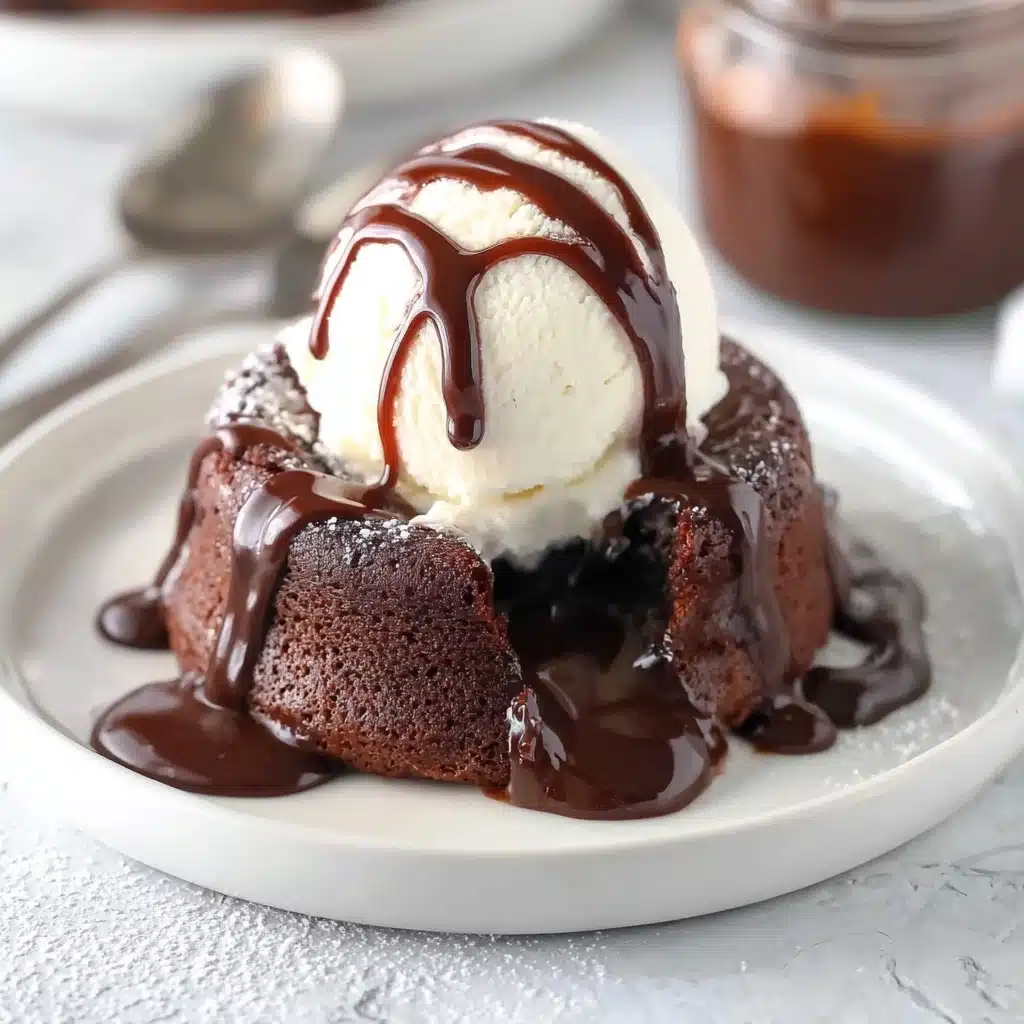
To make your Chocolate Lava Cakes Recipe feel even more special, a light dusting of powdered sugar is the simplest elegant touch. If you want to elevate things, a dollop of freshly whipped cream or a scoop of vanilla ice cream adds refreshing creaminess that balances the richness of the cake beautifully. Top with a few fresh strawberries for a burst of color and subtle tartness that pairs delightfully with the chocolate.
Side Dishes
While the cakes shine on their own, you can create an impressive dessert plate by pairing them with homemade or store-bought hot fudge sauce drizzled liberally over the top. A side of fresh berries or a small bowl of espresso makes for a delightful contrast of flavors and textures, perfect for an indulgent after-dinner treat.
Creative Ways to Present
For an unforgettable presentation, serve these cakes in their ramekins nestled on a rustic wooden board surrounded by an assortment of garnishes. You could also top each cake with a decorative swirl of crème fraîche and sprinkle with finely chopped toasted nuts or a pinch of sea salt for a sophisticated flavor twist. For special occasions, add edible gold leaf or a delicate chocolate shard to really impress your guests.
Make Ahead and Storage
Storing Leftovers
If you happen to have any cakes left over (though honestly, that rarely happens), cover them tightly with plastic wrap and store in the refrigerator. They will keep well for up to 2 days, maintaining most of their luscious texture and flavor for a quick treat anytime.
Freezing
To freeze, make the batter and pour it into greased ramekins, then cover each ramekin tightly with plastic wrap and foil. You can store them frozen for up to one month. When you’re ready, thaw in the fridge overnight and bake as usual, adding a minute or two to the baking time to account for the chilled batter.
Reheating
Reheat leftover Chocolate Lava Cakes Recipe gently in the microwave on low power for 30 to 45 seconds or warm them in a 300-degree oven for about 5 minutes. This revives the warm, molten center without drying out the cake. Serve immediately for that gooey fresh-baked feeling.
FAQs
What if I don’t have ramekins? Can I use a muffin tin?
Absolutely! A muffin tin works in a pinch, though it can be trickier to get the cakes out cleanly. Fill only 10 of the cups to allow room for the batter to rise, and reduce baking time by a few minutes. Just be careful when removing the cakes since they may be more delicate without the ramekin walls.
Can I make this recipe gluten-free?
Yes! Simply swap the all-purpose flour for a 1:1 gluten-free flour blend. Many readers have found this substitution works wonderfully without compromising the texture or flavor of the lava cakes.
Why is it important not to overbake the lava cakes?
The magic of this Chocolate Lava Cakes Recipe lies in the molten center. Overbaking sets the chocolate filling, turning it from liquid silk to solid, which defeats the purpose of the melt-in-your-mouth experience. Stick close to the recommended baking time and watch for those jiggles in the center.
Can I prepare the batter ahead of time?
Definitely! You can make the batter and fill the ramekins 1 to 2 days in advance. Cover tightly with plastic wrap and refrigerate. When ready to bake, remove the plastic wrap and add an extra 30 to 60 seconds to the baking time to accommodate the chilled batter.
What type of chocolate is best for this recipe?
A high-quality semisweet or bittersweet chocolate that melts well is ideal. Brands like Ghirardelli or Guittard chocolate chips are highly recommended. They provide a rich flavor without becoming too bitter or too sweet, allowing the lava cakes to have the perfect balance.
Final Thoughts
There’s something truly special about this Chocolate Lava Cakes Recipe that makes it a favorite time and time again. Whether you’re treating yourself after a long day or impressing friends and family, these cakes deliver a warm chocolate hug every time. Trust me, once you master this recipe, you’ll find yourself reaching for it whenever you want a bit of cozy decadence in your life. Now, grab your mixing bowls — happiness is just a batch away!
“`
PrintChocolate Lava Cakes Recipe

Chocolate lava cakes feature a rich, decadent outer cake with a molten, gooey chocolate center. This classic dessert is surprisingly easy to make at home and perfect for serving warm with ice cream or berries. The recipe uses quality bittersweet or semisweet chocolate, and a combination of whole eggs and egg yolks for a light yet luscious texture. With simple ingredients and key techniques like properly greasing ramekins and careful baking, you can create an indulgent molten chocolate experience in under 40 minutes.
- Prep Time: 20 minutes
- Cook Time: 13 minutes
- Total Time: 33 minutes
- Yield: 6 cakes 1x
- Category: Dessert
- Method: Bake
- Cuisine: American
- Diet: Vegetarian
Ingredients
For the Ramekins:
- 2 to 3 tablespoons butter, softened
- 2 to 3 tablespoons unsweetened cocoa powder
Cakes:
- 1 cup (170 g) chopped semisweet or bittersweet chocolate (recommended Ghirardelli or Guittard chocolate chips)
- 10 tablespoons (140 g) salted butter
- Pinch of salt, about 1/8 teaspoon (use more if using unsalted butter)
- ½ teaspoon vanilla extract
- 3 large eggs
- 3 large egg yolks
- 1 ½ cups (171 g) powdered sugar
- ½ cup (71 g) all-purpose flour
Instructions
- Preheat Oven: Set your oven to 375-400 degrees F. Adjust depending on your oven’s accuracy; a lower temperature like 375°F is best if your oven runs hot.
- Prepare Ramekins: Grease the bottom and sides of six 6- or 8-ounce ramekins by brushing softened butter thoroughly over all surfaces, especially the crevices where sides meet the bottom. Sprinkle cocoa powder evenly inside each ramekin and tap out the excess to ensure easy cake release.
- Melt Chocolate and Butter: In a medium bowl, combine chopped chocolate and butter. Microwave in 1-minute intervals, stirring after each, until fully melted and smooth. Alternatively, melt gently on the stovetop in a saucepan, taking care not to overheat.
- Add Flavorings and Cool: Off the heat, stir in the pinch of salt and vanilla extract. Allow the mixture to cool to room temperature; it should be warm but not hot to the touch before proceeding.
- Beat Eggs and Yolks: In a large mixing bowl, use a handheld mixer or stand mixer with a paddle attachment to beat the three whole eggs and three egg yolks together at high speed until the mixture is thick, creamy, foamy, and light in color, about 2-3 minutes. This step is essential for cake texture.
- Add Sugar and Combine: Mix in the powdered sugar until fully incorporated. Then fold in the cooled melted chocolate mixture and sifted flour using a spatula or spoon, stirring gently just until no streaks remain. Avoid overmixing to maintain lightness.
- Fill Ramekins: Distribute the batter evenly between the prepared ramekins, filling each about two-thirds full to allow for rising and an intact molten center.
- Bake: Place ramekins on a baking sheet spaced a couple inches apart. Bake for 12-13 minutes until the edges and top are set but the center still jiggles slightly when touched. Accurate timing is vital to ensure a molten core.
- Rest and Loosen: Remove ramekins from the oven and let cakes sit for 2-3 minutes. Carefully run a small knife or thin spatula around the edges of each cake to loosen from the ramekin.
- Invert and Serve: Place a serving plate upside down over each ramekin. Holding both together, flip to release the cake onto the plate. If the cake doesn’t easily dislodge, tap the bottom of the ramekin gently. Dust with powdered sugar or serve alongside whipped cream, ice cream, strawberries, or warm fudge sauce for an indulgent dessert experience.
Notes
- Oven Temperature: Original recipe used 425°F, but 375-400°F works better in modern ovens to avoid overbaking.
- Chocolate: Use high-quality melting chocolate like Ghirardelli or Guittard chips for best texture and flavor; not all chocolate chips melt well.
- Greasing Ramekins: Butter and cocoa powder coating works best for clean release; non-stick sprays with flour can leave residue.
- Make Ahead: Batter can be prepared and divided into ramekins 1-2 days prior, covered with plastic wrap and refrigerated. Add 30-60 seconds extra baking time if baking from cold batter.
- Ramekin Size: 8-ounce ramekins yield 6 servings; 6-ounce ramekins may yield 8 smaller cakes.
- Gluten-Free Option: Substitute all-purpose flour with a 1:1 gluten-free flour blend as needed.
Nutrition
- Serving Size: 1 cake (approx. 120 grams)
- Calories: 557 kcal
- Sugar: 41 g
- Sodium: 206 mg
- Fat: 35 g
- Saturated Fat: 20 g
- Unsaturated Fat: 13 g
- Trans Fat: 0 g
- Carbohydrates: 54 g
- Fiber: 3 g
- Protein: 7 g
- Cholesterol: 231 mg
Keywords: chocolate lava cakes, molten chocolate cake, molten lava cake, chocolate dessert, easy chocolate cake, chocolate fondant