Twix Cookie Bars Recipe
Introduction
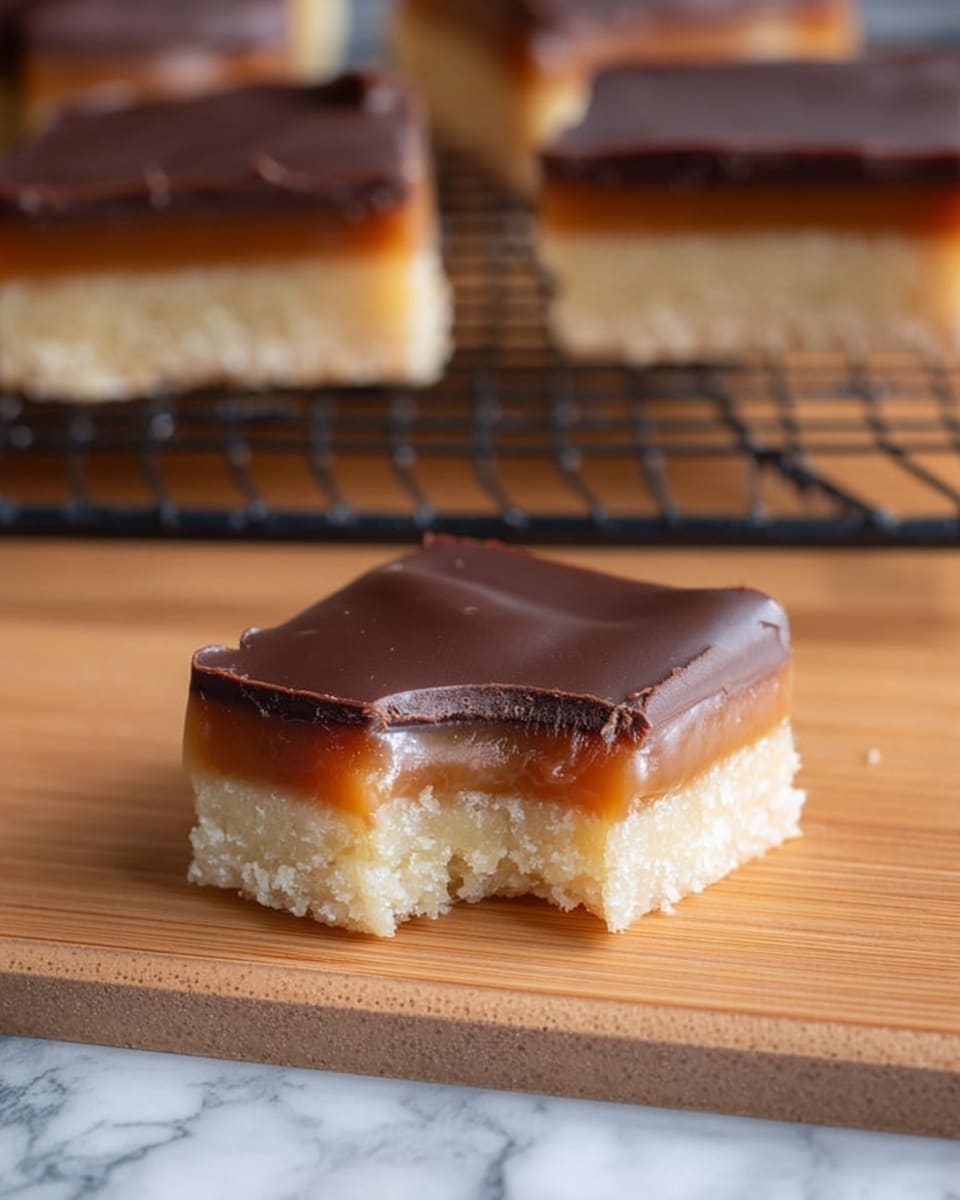
Twix Cookie Bars capture the irresistible combination of buttery crust, rich caramel, and silky chocolate in one delicious treat. These bars are perfect for sharing or indulging in a classic candy-inspired dessert at home.

Ingredients
- 1 cup (2 sticks) salted butter, room temperature
- 1 cup (4.5 ounces) powdered sugar
- 2 cups (10 ounces) all-purpose flour
- 1 teaspoon pure vanilla extract
- 6 tablespoons salted butter
- ⅛ teaspoon salt
- ½ cup light corn syrup
- 1 cup (7.5 ounces) granulated sugar
- 1 cup heavy whipping cream, divided
- 1 teaspoon pure vanilla extract
- 1 ¼ cups (8 ounces) milk or dark chocolate
- ⅓ to ½ cup (3.5 ounces) heavy whipping cream
Instructions
- Step 1: Preheat the oven to 300 degrees F. Line a 9×13” pan with tin foil, spray the bottom and sides, and set aside.
- Step 2: In a large bowl, combine the butter, powdered sugar, flour, and vanilla extract. Mix with a pastry blender or fork until the mixture is very crumbly and sticks together when pressed. Press the crust gently into the prepared pan.
- Step 3: Bake the crust for 40 minutes or until lightly golden brown. Remove from the oven and let cool.
- Step 4: For the caramel layer, combine butter, salt, corn syrup, sugar, and ½ cup of the cream in a medium saucepan over low heat. Warm slowly until butter melts (about 10 minutes), stirring gently to combine.
- Step 5: Increase heat to medium-low and simmer without stirring for 20-30 minutes until the caramel reaches 235 degrees F.
- Step 6: Pour in the remaining ½ cup cream and gently swirl once or twice. Continue simmering without stirring for another 10-15 minutes until it returns to 235 degrees F.
- Step 7: Remove caramel from heat, stir in vanilla extract, and pour over the cooled crust. Smooth evenly and refrigerate for 45 to 60 minutes until set.
- Step 8: For the chocolate layer, combine chocolate and ⅓ to ½ cup heavy whipping cream in a microwavable bowl. Microwave in 30-second intervals, stirring well between each until chocolate just starts to melt.
- Step 9: Pour the chocolate over the set caramel layer and smooth evenly. Refrigerate for 3-4 hours until fully set.
- Step 10: Carefully remove the tin foil and cut into 4 rows by 8 bars, yielding 32 bars in total.
Tips & Variations
- Use a double boiler instead of a microwave to melt chocolate gently and prevent overheating.
- For a richer caramel, substitute light corn syrup with golden syrup or honey.
- To add texture, sprinkle chopped nuts over the caramel before adding the chocolate layer.
Storage
Store Twix Cookie Bars in an airtight container in the refrigerator for up to two weeks. For longer storage, freeze for up to two months and thaw in the fridge before serving. These bars can be enjoyed immediately after setting but taste best after chilling thoroughly.
How to Serve
Serve this delicious recipe with your favorite sides.
FAQs
Can I use unsalted butter instead of salted butter?
Yes, but reduce added salt slightly (about ⅛ teaspoon) to balance the flavors.
What if I don’t have a candy thermometer?
Cook the caramel on low heat and watch for a deep golden color and thick consistency. It may take some practice, but careful simmering without stirring helps achieve the right texture.
PrintTwix Cookie Bars Recipe
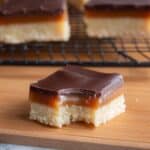
These Twix Cookie Bars combine a buttery crumbly crust, a rich homemade caramel layer, and a smooth chocolate topping, capturing the classic flavors of a Twix candy bar in an easy-to-make treat. With a perfectly balanced texture and taste, these bars are ideal for dessert lovers craving a homemade candy-inspired sweet.
- Prep Time: 20 minutes
- Cook Time: 1 hour 10 minutes
- Total Time: 1 hour 30 minutes plus chilling time
- Yield: 32 bars 1x
- Category: Dessert
- Method: Baking
- Cuisine: American
Ingredients
Crust Layer
- 1 cup (2 sticks) salted butter, room temperature
- 1 cup (4.5 ounces) powdered sugar
- 2 cups (10 ounces) all-purpose flour
- 1 teaspoon pure vanilla extract
Caramel Layer
- 6 tablespoons salted butter
- ⅛ teaspoon salt
- ½ cup light corn syrup
- 1 cup (7.5 ounces) granulated sugar
- ½ cup heavy whipping cream
- 1 cup heavy whipping cream (divided total)
- 1 teaspoon pure vanilla extract
Chocolate Layer
- 1 ¼ cups (8 ounces) milk or dark chocolate chips/chopped chocolate
- ⅓ to ½ cup (3.5 ounces) heavy whipping cream
Instructions
- Prepare the crust: Preheat the oven to 300°F (150°C). Line a 9×13 inch pan with tin foil and spray the bottom and sides with nonstick spray. In a large bowl, mix the butter, powdered sugar, flour, and vanilla using a pastry blender or fork until the mixture is very crumbly but sticks together when pressed. Press the mixture evenly into the prepared pan using your hands.
- Bake the crust: Bake in the preheated oven for 40 minutes or until the crust is lightly golden brown. Remove from oven and allow to cool completely.
- Make the caramel layer: While the crust bakes, combine butter, salt, corn syrup, granulated sugar, and ½ cup of heavy cream in a medium saucepan over low heat. Warm slowly, stirring gently until butter melts (about 10 minutes). Increase heat to medium-low and let simmer without stirring for 20 to 30 minutes until the temperature reaches 235°F (soft-ball stage). Pour in the remaining ½ cup heavy cream and swirl gently. Continue simmering without stirring for 10 to 15 minutes, maintaining 235°F. Remove from heat and stir in the vanilla extract.
- Assemble caramel layer: Pour the caramel over the cooled crust (it can be slightly warm) and quickly smooth it evenly. Refrigerate for 45 to 60 minutes until the caramel is set.
- Prepare the chocolate layer: Combine the chocolate and ⅓ to ½ cup of heavy cream in a microwave-safe bowl or a double boiler. Heat in 30-second increments in the microwave, stirring between intervals just until the chocolate melts and is smooth. Avoid overheating to prevent seizing.
- Assemble chocolate topping: Pour the melted chocolate over the set caramel layer and smooth it out evenly. Refrigerate for 3 to 4 hours until the bars are completely set.
- Serve and store: Remove the bars from the pan by lifting the foil. Cut into 4 rows by 8 columns to make 32 bars. These can be eaten immediately or stored in an airtight container in the refrigerator for up to two weeks, or frozen for several months for extended storage.
Notes
- When cooking caramel, maintain proper temperature to avoid burning; use a candy thermometer for accuracy.
- Elevation adjustments may be necessary for caramel temperature — higher altitudes require a lower final temperature.
- Use good-quality chocolate for best flavor and melting performance.
- Do not overheat chocolate to avoid it seizing and becoming unusable.
Keywords: Twix, cookie bars, caramel bars, chocolate bars, homemade candy bars, dessert bars, easy dessert