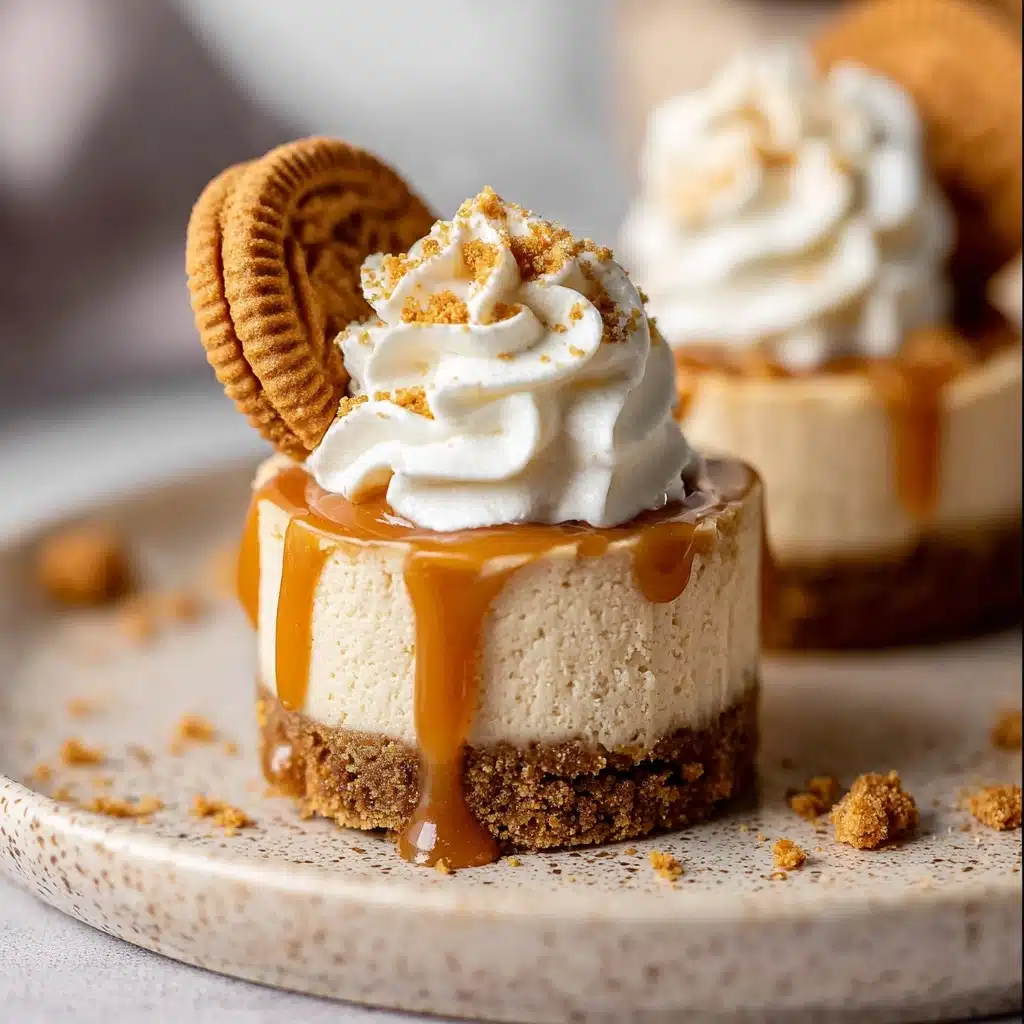
No Bake Mini Biscoff Cheesecakes
If you’re on the hunt for a truly delightful dessert that’s as rich in flavor as it is effortless to make, let me introduce you to the magic of https://krollskorner’s No Bake Mini Biscoff Cheesecakes. These little wonders bring together a heavenly combination of creamy Biscoff cheesecake filling and a crunchy, buttery cookie crust. Each bite delivers a warm, spiced caramel flavor that feels like a cozy hug, making them the perfect treat to impress friends or simply indulge yourself. Ready to dive into this creamy, no-bake delight? Let’s go!
Ingredients You’ll Need
The beauty of these mini no bake biscoff cheesecakes lies in their simplicity. Each ingredient brings a unique touch that blends seamlessly to create a creamy texture, balanced sweetness, and that signature spiced flavor you crave. Let’s check out what you’ll need:
- Biscoff cookies: Ground finely to make a crisp, flavorful crust with a hint of warm spice.
- Melted unsalted butter: Binds the cookie crumbs together perfectly for a sturdy base.
- Cold heavy cream: Whipped to stiff peaks for a light, airy cheesecake filling.
- Full-fat cream cheese: The rich, creamy heart of the cheesecake – make sure it’s softened to room temperature.
- Powdered sugar: Smoothly sweetens without any grittiness.
- Creamy Biscoff cookie butter: Brings that deep caramel and spice flavor throughout.
- Sour cream: Adds tangy balance and helps create that soft, dreamy texture.
- Pure vanilla extract: Enhances all the sweet flavors with its warm aroma.
- Pinch of salt: Balances the sweetness and deepens the overall flavor profile.
- Additional Biscoff cookie butter: For melting on top and adding that luscious finishing touch.
- Extra Biscoff cookies and whipped cream: For garnish, adding texture and visual appeal.
How to Make https://krollskorner
Step 1: Prepare the Crust
Start by blitzing the Biscoff cookies into fine crumbs using a food processor. Slowly stream in the melted butter and mix until the crumbs resemble wet sand that sticks together when pressed. This buttery crust is the foundation of your mini cheesecakes and its slight crunch balances beautifully with the creamy filling.
Step 2: Form the Crust Base
Spray your mini cheesecake pans or muffin tins with non-stick spray. Press about a tablespoon of the cookie crumb mixture into each cup firmly, creating an even base. Pop these into the fridge or freezer while you get busy on the luscious filling – chilling helps the crust set so it stays intact when you’re ready to enjoy.
Step 3: Whip the Cream
Next, whip the cold heavy cream until stiff peaks form. This step is essential for that light and fluffy texture in your cheesecake. Be careful not to overwhip; you want the cream firm but still smooth. Once done, tuck it back in the fridge to keep chilled until it’s time to fold it in.
Step 4: Mix the Cheesecake Filling
In a separate bowl, beat together the softened cream cheese, powdered sugar, creamy Biscoff cookie butter, sour cream, vanilla extract, and a pinch of salt. This mixture needs to be perfectly smooth and creamy, which sets the stage for the dreamy cheesecake filling everyone will rave about.
Step 5: Fold in the Whipped Cream
Gently fold the whipped cream into your cheesecake mixture using a rubber spatula. This technique keeps the filling light and airy while fully blending the ingredients. The goal is to avoid deflating the whipped cream so your mini cheesecakes come out luscious and fluffy every time.
Step 6: Fill and Chill
Spoon the rich filling into a piping bag fitted with a round tip and pipe evenly over each chilled crust in the pans. Smooth the tops gently for a polished look. Cover the cheesecakes loosely in the fridge, and let them set for at least 6 hours, or ideally overnight, to develop that perfect creamy texture.
Step 7: Add the Biscoff Topping
After chilling, melt the remaining Biscoff cookie butter in the microwave just until it’s spreadable. Spoon or drizzle this over the top of each mini cheesecake, allowing it to slightly drip down the sides for a decadent finish. Return them to the fridge for 15–20 minutes until the topping sets nicely.
Step 8: Garnish and Serve
Now it’s time for the fun part! Garnish each mini cheesecake with extra Biscoff cookies—whole or crushed—and a dollop of whipped cream to make them look irresistible. These adorable little bites are ready to steal the show at any party or cozy night in.
How to Serve https://krollskorner

Garnishes
The garnishes bring personality and texture to this treat. A small piece of Biscoff cookie perched on top adds a delightful crunch and a gorgeous rustic look. A swirl of whipped cream creates a soft, creamy contrast while crushed crumbs add an inviting, homemade touch. Your guests will appreciate the care and charm in each bite.
Side Dishes
These mini cheesecakes shine best as a standalone dessert, but if you want to elevate the experience, fresh berries or a tangy fruit compote on the side can brighten the flavors beautifully. A cup of bold coffee or tea will complement the caramel notes perfectly, making your dessert course truly memorable.
Creative Ways to Present
For a stunning presentation, try serving the mini cheesecakes on a rustic wooden board or elegant dessert platter. You can layer them on tiered cake stands for a party-ready display. Adding edible flowers or gold leaf flakes to the garnish will take your https://krollskorner creations from tasty to spectacular in no time!
Make Ahead and Storage
Storing Leftovers
After you’ve savored these bites of heaven, store any leftovers in an airtight container in the fridge for up to 4 days. Keeping them chilled preserves their creamy texture and fresh flavor, ensuring each bite tastes just as wonderful as the first.
Freezing
If you want to keep these cheesecakes on hand for longer, they freeze beautifully. Pop them in a freezer-safe container for up to 3 months. When you’re ready to enjoy, simply thaw them in the refrigerator overnight to maintain that perfect no-bake consistency and luscious creaminess.
Reheating
Since these are no-bake, just serve them chilled—there’s no reheating needed. Thawed cheesecakes may lose a bit of their firmness if left at room temperature too long, so keep them refrigerated until serving to make sure they stay beautifully firm and creamy.
FAQs
Can I use a regular muffin pan instead of a mini cheesecake pan?
Yes! You can use a 12-count muffin pan lined with cupcake liners or sprayed with non-stick spray. Just keep in mind the size difference, as mini cheesecake pans are usually smaller and create a more delicate portion.
Can I make these cheesecakes ahead of time?
Absolutely! These cheesecakes actually benefit from being made ahead. Letting them chill overnight helps the flavors meld and the texture set perfectly, making your party prep much easier.
What if I don’t have Biscoff cookie butter? Can I substitute it?
Biscoff cookie butter is pretty essential for that signature flavor, but you can experiment with peanut butter or another spiced cookie butter for a different twist. Just keep in mind it will alter the flavor profile.
Why do I need to whip the heavy cream separately?
Whipping the heavy cream to stiff peaks before folding into the filling lightens the cheesecake and adds airiness. It creates that fluffy, soft texture that makes these cheesecakes so irresistible.
Can I make a full-size cheesecake using this recipe?
Yes! The recipe works well in a 9-inch springform pan. Use parchment paper to line the pan and adjust your chilling time accordingly. It’s a wonderful way to enjoy this recipe in a classic cheesecake format.
Final Thoughts
Trust me, once you make these No Bake Mini Biscoff Cheesecakes from https://krollskorner, you’ll understand why they’re such a beloved dessert. Effortless to prepare, rich with flavor, and perfectly portioned, they are ideal for special occasions or any day you want a sweet pick-me-up. Don’t hesitate to whip up a batch soon—you’ll be sharing these favorites in no time and feeling like a dessert superstar!
Printhttps://krollskorner Recipe

These No Bake Mini Biscoff Cheesecakes feature a rich and creamy Biscoff cookie butter filling atop a crunchy, buttery Biscoff cookie crust. With hints of warm cinnamon and caramelized spice notes in every bite, they offer an indulgent yet easy-to-make dessert that requires no baking. Perfect for parties or special occasions, these individual cheesecakes are elegant, light, and delightfully flavorful, topped with melted Biscoff spread, whipped cream, and additional cookie garnish.
- Prep Time: 30 minutes
- Cook Time: 0 minutes (no bake)
- Total Time: 6 hours 30 minutes (including chilling time)
- Yield: 24 mini cheesecakes 1x
- Category: Dessert
- Method: No Bake
- Cuisine: American
- Diet: Vegetarian
Ingredients
Crust
- 1 (8.8 oz, 250g) package Biscoff cookies
- 1/2 cup unsalted melted butter
Filling
- 1 cup cold heavy cream
- 3 (8 oz) blocks full-fat cream cheese, softened to room temperature
- 1 cup powdered sugar
- 1 cup creamy Biscoff cookie butter
- 1/3 cup sour cream, room temperature
- 2 tsp pure vanilla extract
- Pinch of salt
Topping
- 1/2 cup creamy Biscoff cookie butter
- Additional Biscoff cookies for garnish (whole or crushed)
- Whipped cream
Instructions
- Prepare the Crust: Blitz the Biscoff cookies in a food processor until finely ground. Gradually add the melted butter while processing until the mixture is sandy and holds together when pressed.
- Form the Crust: Spray two mini cheesecake pans or two 12-count muffin pans lined with cupcake liners with non-stick spray. Press approximately 1 tablespoon of the crumb mixture into each mold evenly. Freeze or refrigerate to set while preparing the filling.
- Whip the Cream: In a chilled medium mixing bowl, beat the cold heavy cream with a hand mixer or stand mixer fitted with a whisk attachment until stiff peaks form, about 2 minutes. Avoid overbeating. Refrigerate until needed.
- Make the Filling: In a separate medium-large bowl, beat together cream cheese, powdered sugar, Biscoff cookie butter, sour cream, vanilla extract, and salt until smooth and fully combined.
- Fold in Whipped Cream: Gently fold the whipped heavy cream into the cheesecake mixture using a rubber spatula until no white streaks remain, ensuring a light and airy filling.
- Assemble Cheesecakes: Spoon the filling into a piping bag fitted with a round 1A tip and pipe the filling onto the chilled crust bases. Smooth the tops evenly.
- Chill to Set: Refrigerate the assembled mini cheesecakes for at least 6 hours or overnight to allow them to firm up. Cover loosely if desired.
- Add the Topping: Melt 1/2 cup of creamy Biscoff cookie butter in the microwave for 20-30 seconds until smooth. Spread over the chilled cheesecakes; it can drip down the sides. Return to the refrigerator for 15-20 minutes until set.
- Garnish and Serve: Decorate with additional Biscoff cookies (whole or crushed) and whipped cream as desired. Serve and enjoy!
Notes
- Store cheesecakes in an airtight container in the refrigerator for up to 4 days.
- Can be frozen for up to 3 months; thaw overnight in the refrigerator before serving.
- Use full-fat cream cheese and sour cream for best creamy texture.
- Ensure cream cheese is at room temperature before mixing to prevent lumps.
- Whip heavy cream to stiff peaks but avoid overbeating to maintain smooth filling.
- Use mini cheesecake pans or 12-count muffin pans with liners for ideal size; mini muffin pans are smaller and may require recipe adjustment.
- For a full-size cheesecake, use a 9-inch springform pan with the same ingredients.
Nutrition
- Serving Size: 1 mini cheesecake
- Calories: 224 kcal
- Sugar: 10 g
- Sodium: 70 mg
- Fat: 14 g
- Saturated Fat: 7 g
- Unsaturated Fat: 2.3 g
- Trans Fat: 0 g
- Carbohydrates: 15 g
- Fiber: 0.5 g
- Protein: 3 g
- Cholesterol: 23 mg
Keywords: No Bake Cheesecake, Biscoff Cheesecake, Mini Cheesecakes, Biscoff Cookie Butter, Easy Dessert, Party Dessert, No Bake Dessert